Today we will learn a new wave transition implementation for the UICollectionView in Swift using XCode 6.3 :
Getting started
Open Xcode and create a new project by choosing the Single View Application template. Choose iPhone under “Devices”. Choose Swift as main language.
Next, you are presented with the page to set many of the important aspects of your project, particularly your “Product Name” and “Language”, which will be Swift, of course.
Product Name is pretty self-explanatory. The organization name can be whatever you want, but it probably should the the company or name you are releasing your apps under.
The Organization Identifier is part of how your app will be referred to a bit more internally. It is customary to use a reverse domain name of your company as the Organization identifier, so in my case my normal URL of “www.swiftyos.wordpress.com” should become “com.swiftyOS”. You can see below it that the “Bundle Identifier” is created based on the product name and the organization identifier. This is part of how your iOS device determines whether an update to your app is the same app or a new one, by checking this Bundle Identifier.
The Language box gives you the choice of Objective-C or Swift. Of course for this blog, we’ll be choosing Swift for this box. The next box has you select what devices this app should run on. You have the choice of iPhone, iPad, or Universal. Apple is heading more in the way of universal apps, so we’ll go with that for now (though this app will be designed for an iPhone, so it will look a bit silly on an iPad). Finally you can click that checkbox if you want Xcode to get some Core Data code ready for you. I don’t know enough about Core Data yet to really recommend whether or not to use this checkbox when using core data. It would probably be best in the beginning at least not to, if only to let you see all of the moving parts of Core Data by having to set them up yourself. After you learn though, I don’t know if it is better than doing it yourself or not.
When you click next, you will be presented with a save dialog, asking where you want to save your project. Wherever you save it, a folder will be created with your app’s name, and inside will be the Xcode project, and a folder for each target your app has (which is going to be the app itself, and a test target right now). You also have the option to create a Git repository for your project either locally or on a server.
After you click the “Create” button, the files for your project are generated and you are probably looking at your AppDelegate.swift file.
Setting up the Storyboard
Now we’ll set up the storyboard. This app will present the user with a UICollectionView. When a cell of the collection view is tapped a wave like transition occurs which on completion presents a SecondView. In the same way, we have a Second to ThirdView transition.
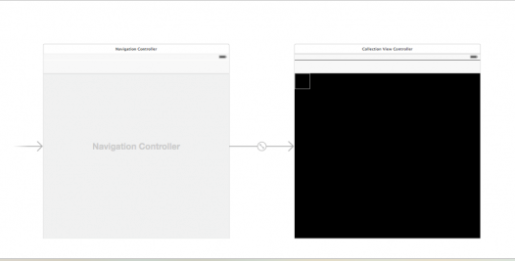
Open Main.storyboard and drag in a Collection View Controller. Go to Editor\Embed in\Navigation Controller to create a navigation controller and automatically set the collection view controller as the root.
You should now have a layout like this in the storyboard:
Make sure the navigation controller is the initial view controller (note the arrow to the left of it).
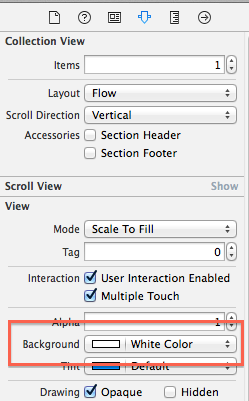
Select the collection view and set the background color to white using the Attributes inspector:
Select the single cell in the collection view and set the Reuse Identifier to cellId using the attributes inspector. This should also be familiar from table views – the data source will use this identifier to dequeue or create new cells.
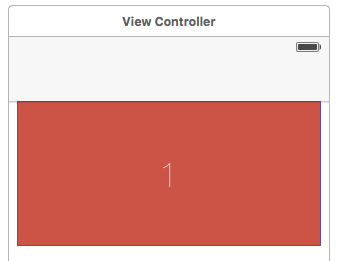
Drag in a UILabel to the center of the collection view cell, as shown in the image above. This will be where we print the increasing numbers.
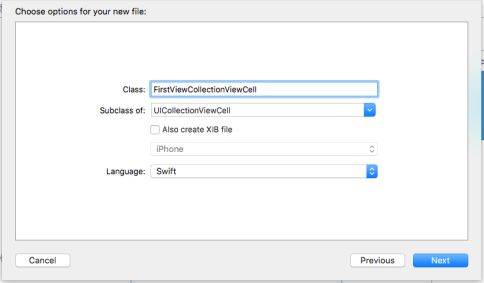
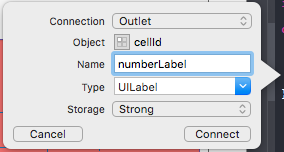
Create a new class for the CollectionViewCell named FirstViewCollectionViewCell.Open the Assistant Editor and select FirstViewCollectionViewCell , then control-drag from the UILabel present on the collection view controller to theFirstViewCollectionViewCell class and choose the outlet:
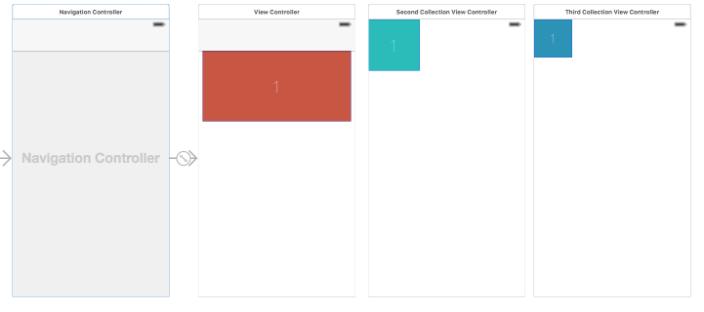
Now drag a 2 new ViewController’s from Object Library, and follow the steps mentioned above from adding collectionView till creating UILabel Outlets. The final Storyboard would look something like this:
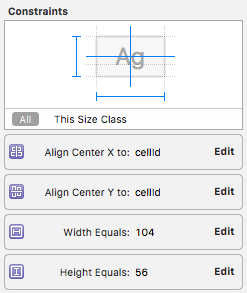
Add the constraints to the label to center it horizontally and vertically, also width & height constraint to the label.
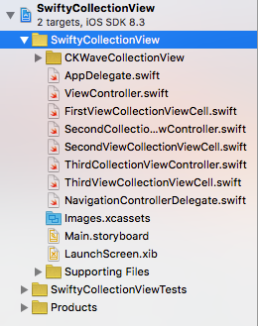
The naming structure for files is as shown below:
Wait! I don’t have NavigationControllerDelegate.swift and CKWaveCollectionView folder in my project structure. This question might be arising in your mind. Don’t worry we’re coming on that right now!
- In storyboard add object in your NavigationController.
- Set it’s class to NavigationControllerDelegate
- Set NavigationController delegate to this object.
OR Implement UINavigationControllerDelegate in your ViewController.
First create a .swift file named NavigationControllerDelegate.swift
At this stage the file will be empty with just an import statement. We need to edit this file for custom transition using navigation controller. The code to be written is as follows:
import UIKit

class NavigationControllerDelegate : NSObject, UINavigationControllerDelegate {

func navigationController(navigationController: UINavigationController, animationControllerForOperation operation: UINavigationControllerOperation,
fromViewController fromVC: UIViewController, toViewController toVC: UIViewController) -> UIViewControllerAnimatedTransitioning? {

let animator = CKWaveCollectionViewAnimator()

if operation != UINavigationControllerOperation.Push {

animator.reversed = true
}

return animator
}
}
Now for the folder named CKWaveCollectionView, it contains files which actually do the wave transition coding and are made freely available by CezaryKopacz on his GitHub repository. You can download the folder from my dropbox link here: Click Here or get it directly from the Github repo of the original creator here. If you download it from the Github repo then you either need to use Cocoapods for integration or need to know XCode well for manual integration. Saving your precious time I have reduced the effort and created a folder named CKWaveCollectionView. All you have to do is just download the folder and drag it into your XCode project. That’s all you need to do !
At the end, all credits go to CezaryKopacz for creating such a beautiful transition code.
Once you have added the folder, we directly jump on editing the DataSource for CollectionViewController’s.
Open the ViewController.swift file and change the line
class ViewController: ViewController {
to
class ViewController: UICollectionViewController {
Let’s start with the Delegate code for CollectionView as shown below:
//MARK :- UICollectionViewDelegate
override func collectionView(collectionView: UICollectionView, didSelectItemAtIndexPath indexPath: NSIndexPath) {

self.selectedIndexPath = indexPath

var vc = self.storyboard?.instantiateViewControllerWithIdentifier("secondVC") as? SecondCollectionViewController
self.navigationController?.pushViewController(vc!, animated: true)
}
Here we set the didSelectItemAtIndexPathfunction and when user taps on one of the cell this functions runs and the view controller is pushed to next View.
The next part is to add DataSource for the collectionView and the code is as shown below:
//MARK :- UICollectionViewDataSource
override func collectionView(collectionView: UICollectionView, cellForItemAtIndexPath indexPath: NSIndexPath) -> UICollectionViewCell {

let cell = collectionView.dequeueReusableCellWithReuseIdentifier("cellId", forIndexPath: indexPath) as! FirstViewCollectionViewCell

cell.numberLabel.text = "\(indexPath.row + 1)"
cell.backgroundColor = colorForIndex(indexPath.row)
return cell
}

override func collectionView(collectionView: UICollectionView, numberOfItemsInSection section: Int) -> Int {
return 18
}

override func numberOfSectionsInCollectionView(collectionView: UICollectionView) -> Int {
return 1
}
func colorForIndex(index: NSInteger) -> UIColor {

var itemCount:Int = 17
var a = Float(index)
var b = Float(itemCount)
var val = (a/b) * 0.8

var sender:UIColor = UIColor(red: CGFloat(0.25), green: CGFloat(val), blue: CGFloat(0.5), alpha: CGFloat(1.0))

return sender
}
The DataSource code has cellForItemAtIndexPath function to represent data for each cell. Next, numberOfItemsInSection returns the number of cells that are to be displayed. Similarly, we have numberOfSectionsInCollectionViewwhich represents the number of sections in a collectionView.
The function colorForIndex is a little code to tweak the backgroundColor of the collectionView cells. It creates a gradient effect on the cells.
Similarly we have to create Delegate & DataSource code for SecondCollectionViewController, ThirdCollectionViewController as shown below:
SecondCollectionViewController.swift :
class SecondCollectionViewController: UICollectionViewController {

//MARK :- UICollectionViewDelegate
override func collectionView(collectionView: UICollectionView, didSelectItemAtIndexPath indexPath: NSIndexPath) {

self.selectedIndexPath = indexPath
var vc = self.storyboard?.instantiateViewControllerWithIdentifier("thirdVC") as? ThirdCollectionViewController
self.navigationController?.pushViewController(vc!, animated: true)
}

//MARK :- UICollectionViewDataSource
override func collectionView(collectionView: UICollectionView, cellForItemAtIndexPath indexPath: NSIndexPath) -> UICollectionViewCell {

var cell = collectionView.dequeueReusableCellWithReuseIdentifier("cellId", forIndexPath: indexPath) as! SecondViewCollectionViewCell

cell.numberLabel.text = "\(indexPath.row + 1)"

return cell
}

override func collectionView(collectionView: UICollectionView, numberOfItemsInSection section: Int) -> Int {
return 40
}

override func numberOfSectionsInCollectionView(collectionView: UICollectionView) -> Int {
return 1
}
}
ThirdCollectionViewController.swift :
class ThirdCollectionViewController: UICollectionViewController {

//MARK :- UICollectionViewDelegate
override func collectionView(collectionView: UICollectionView, didSelectItemAtIndexPath indexPath: NSIndexPath) {

self.selectedIndexPath = indexPath
}

//MARK :- UICollectionViewDataSource
override func collectionView(collectionView: UICollectionView, cellForItemAtIndexPath indexPath: NSIndexPath) -> UICollectionViewCell {

var cell = collectionView.dequeueReusableCellWithReuseIdentifier("cellId", forIndexPath: indexPath) as! ThirdViewCollectionViewCell

cell.numberLabel.text = "\(indexPath.row + 1)"

return cell
}

override func collectionView(collectionView: UICollectionView, numberOfItemsInSection section: Int) -> Int {
return 100
}

override func numberOfSectionsInCollectionView(collectionView: UICollectionView) -> Int {
return 1
}
}
Running the App
So now you run the app with the big “Play” button in the top left of Xcode. You then need to set what device to run the app on. You can select a physical device (if you have a paid developer license). Otherwise, or even just for simpler testing, you can run it in the simulator. Choose the simulated device to run it on from the same menu.
Then wait a bit while the simulator loads. Mine took about 30 seconds to load. Then click on a cell and watch the magical wave transition occur!
Here is the source code on Github for the tutorial above !
I hope you found this article helpful. If you did, please don’t hesitate to share this post on Twitter or your social media of choice. The blog is still pretty new, and every share helps. Of course, if you have any questions, don’t hesitate to contact me on Twitter @swifty_os, and I’ll see what I can do. Thanks!


1 Pingback