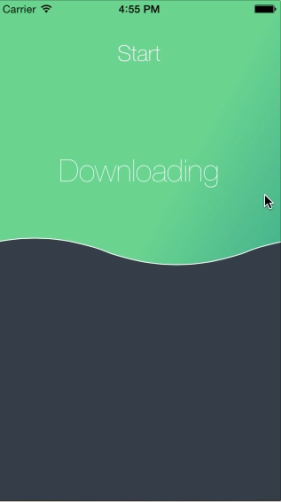
Today we will learn a new fluid animation as a loading indicator in Swift using XCode 6.3 :
Getting started
Open Xcode and create a new project by choosing the Single View Application template. Choose iPhone under “Devices”. Choose Swift as main language.
Next, you are presented with the page to set many of the important aspects of your project, particularly your “Product Name” and “Language”, which will be Swift, of course.
Product Name is pretty self-explanatory. The organization name can be whatever you want, but it probably should the the company or name you are releasing your apps under.
The Organization Identifier is part of how your app will be referred to a bit more internally. It is customary to use a reverse domain name of your company as the Organization identifier, so in my case my normal URL of “www.swiftyos.wordpress.com” should become “com.swiftyOS”. You can see below it that the “Bundle Identifier” is created based on the product name and the organization identifier. This is part of how your iOS device determines whether an update to your app is the same app or a new one, by checking this Bundle Identifier.
The Language box gives you the choice of Objective-C or Swift. Of course for this blog, we’ll be choosing Swift for this box. The next box has you select what devices this app should run on. You have the choice of iPhone, iPad, or Universal. Apple is heading more in the way of universal apps, so we’ll go with that for now (though this app will be designed for an iPhone, so it will look a bit silly on an iPad). Finally you can click that checkbox if you want Xcode to get some Core Data code ready for you. I don’t know enough about Core Data yet to really recommend whether or not to use this checkbox when using core data. It would probably be best in the beginning at least not to, if only to let you see all of the moving parts of Core Data by having to set them up yourself. After you learn though, I don’t know if it is better than doing it yourself or not.
When you click next, you will be presented with a save dialog, asking where you want to save your project. Wherever you save it, a folder will be created with your app’s name, and inside will be the Xcode project, and a folder for each target your app has (which is going to be the app itself, and a test target right now). You also have the option to create a Git repository for your project either locally or on a server.
After you click the “Create” button, the files for your project are generated and you are probably looking at your AppDelegate.swift file.
Setting up the Cocoapods
In our last project of Animated Wave Transition in CollectionView, we ignored the use of Cocoapods and manually inserted the animation class files into our project which is kind of tedious for beginners. Let’s learn a new technique of importing projects hosted on Github using Cocoapods.
To get started, you first need to install CocoaPods. CocoaPods runs on Ruby, yet that’s the only dependency it has. Fortunately, all recent versions of Mac OS X (since OS X 10.7 Lion) ship with Ruby already installed. So all you need to do is update RubyGems (just to make sure you have a recent version).
To do so, open Terminal and type the following command:
sudo gem update --system
Enter your password when requested. This update may take a little while, so be patient and give it a few minutes to complete. You can also expect some documentation in the Terminal window about the latest version, you can ignore this for now.
Next, you need to install CocoaPods. Type this command in Terminal to do so:
sudo gem install cocoapods
Lastly, enter this command in Terminal to complete the setup of CocoaPods:
pod setup
This process will likely take a while as this command clones the CocoaPods Specs repository into ~/.cocoapods/ on your computer.
Great, you’re now setup to use CocoaPods!
Installing Your First Dependency
Open Terminal and navigate to the directory containing your ShowTracker project by using the cd command:
cd ~/Path/To/Folder/Containing/FluidLoadingIndicator
Next enter this command:
pod init
This will create a default Podfile for your project. The Podfile is where you define the dependencies your project relies on.
Type this command to open Podfile using Xcode for editing:
open -a Xcode Podfile
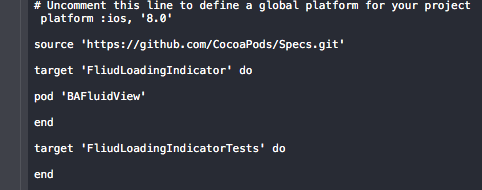
This will open the podfile in XCode and is the location where you need to set the target and write down the dependency. Edit the Podfile as shown below:
Here we are changing the platform :ios, ‘8.0’ on line 2, pod ‘BAFluidView’ on line 8. After the changes are done, save and close the pod file.
You now need to tell CocoaPods to “install” the dependencies for your project. Enter the following command in Terminal to do so (making sure that you’re still in the directory containing the ShowTracker project and Podfile):
pod install
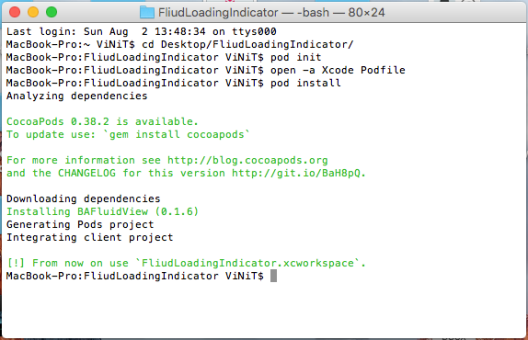
You should see output similar to the following:
Close the Xcode project (if you had it open) and open FluidLoadingIndicator.xcworkspace. (Warning: From now on, as the command-line warning mentioned, you must always open the workspace (FluidLoadingIndicator.xcworkspace) and not the project!)
Congratulations, you just add a dependency using Cocoapods. Since the project that we imported was written in Onjective-C we need to create a bridging header file and point all the Obj-C header files there. Now create a bridging header file for your project and add the line:
#import "BAFluidView.h"
This line will import all the BAFluidView functions for our project.
We also need to import some standard Apple frameworks such as CoreGraphics, UIKit, Foundation. Go to the main project file in the left panel > scroll down for Linked Frameworks and Libraries > press the + button to add those Frameworks mentioned before.
Setting up the Storyboard
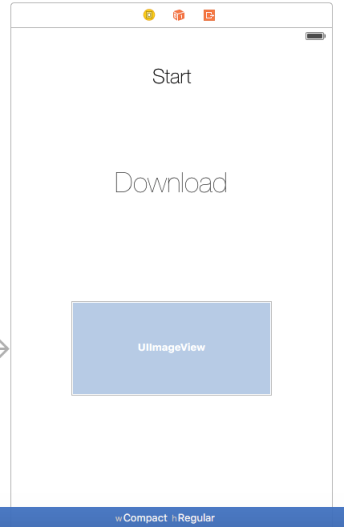
Now we’ll set up the storyboard. This app will download an image from a server and display it in a UIImage. Till the time it’s downloading we will show a nice Fluid Loading Animation. This app requires a Start button to fire the loading indication and download process. A basic label to display the status and a UIImage to display the downloaded image.
Open Main.storyboard and you will see a single ViewController which is all we need.
- Drag a UIView and set it’s constraints to the screen size.
- Drag another UIView and place it on top of previous UIView along with screen size constraints.
- Add a UIButton named “Start” and place it at top center position.
- Add a UILabel around 150px below the Start button and centered in X-axis.
- Add a UIImage around 200px below the UILabel, again in the center position for X-axis.
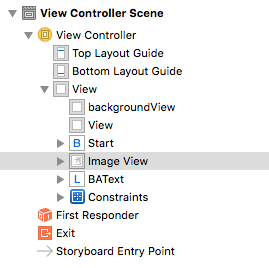
The hierarchy for the elements in the ViewController should be as follows:
You should now have a layout like this in the storyboard:
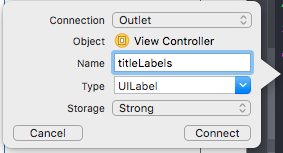
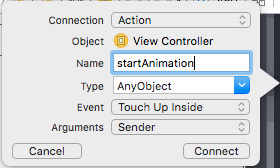
Connect the Start button, Download status label, UIImageView and the 2 UIViews in the ViewController.swift file. Open the assistant editor, press ctrl + drag and create all the outlets one after the other. Also add an Action for the Start button.
Refer the naming for the outlets from the image below:
(Note: The top most UIView is named as exampleContainerView )
Setting up the ViewController code :
Open the ViewController.swift file and add some lines in the viewDidLoad function:
override func viewDidLoad() {
super.viewDidLoad()
// Do any additional setup after loading the view, typically from a nib.

setUpBackground()
startAnime.setTitleColor(UIColor.whiteColor(), forState: .Normal)
titleLabels.text = ""

}
Here, the setUpBackground function sets a gradient color to the backgroundView that we have placed in our storyboard. The next line changes the color of Start button to white color. Third line changes the text of UILabel to empty string.
Now let’s add setUpBackground function as shown below:
var gradient = CAGradientLayer()

func setUpBackground() {

if ((self.gradient) != nil) {
self.gradient.removeFromSuperlayer()
self.gradient = nil
}

var tempLayer: CAGradientLayer = CAGradientLayer()
tempLayer.frame = self.view.bounds
tempLayer.colors = [UIColor(netHex: 0x53cf84).CGColor, UIColor(netHex: 0x53cf84).CGColor, UIColor(netHex: 0x2aa581).CGColor, UIColor(netHex: 0x1b9680).CGColor]
tempLayer.locations = [NSNumber(float: 0.0), NSNumber(float: 0.5), NSNumber(float: 0.8), NSNumber(float: 1.0)]
tempLayer.startPoint = CGPointMake(0, 0)
tempLayer.endPoint = CGPointMake(1, 1)

self.gradient = tempLayer
self.backgroundView.layer.insertSublayer(self.gradient, atIndex: 1)
self.exampleContainerView.hidden = true

}
The code above adds a gradient color to the background for good looking UI.
Wait! you’re getting error for the code UIColor(netHex: 0xXXXXXX), don’t you worry about that, I’m using a custom extension to provide the UIColor in Hex format. The extension for it is given below:
(Paste this code at the bottom of your ViewController.swift file,i.e, even after the closing brace of your ViewController class)
extension UIColor {
convenience init(red: Int, green: Int, blue: Int) {
assert(red >= 0 && red <= 255, "Invalid red component")
assert(green >= 0 && green <= 255, "Invalid green component")
assert(blue >= 0 && blue <= 255, "Invalid blue component")

self.init(red: CGFloat(red) / 255.0, green: CGFloat(green) / 255.0, blue: CGFloat(blue) / 255.0, alpha: 1.0)
}

convenience init(netHex:Int) {
self.init(red:(netHex >> 16) & 0xff, green:(netHex >> 8) & 0xff, blue:netHex & 0xff)
}
}
Now we will come to the main function,i.e, the Action of the Start Button that we linked earlier. This function is the most important part in this app.
Have a look at it:
@IBAction func startAnimation(sender: AnyObject) {

var myView:BAFluidView = BAFluidView(frame: self.view.frame, startElevation: 0.5)

myView.strokeColor = UIColor.whiteColor()
myView.fillColor = UIColor(netHex: 0x2e353d)
myView.keepStationary()
myView.startAnimation()
titleLabels.textColor = UIColor.whiteColor()
self.exampleContainerView.hidden = false
myView.startAnimation()

self.view.insertSubview(myView, aboveSubview: self.backgroundView)

UIView.animateWithDuration(0.5, animations: {
myView.alpha=1.0
}, completion: { _ in
self.titleLabels.text = "Downloading"
self.startAnime.enabled = false
self.exampleContainerView.removeFromSuperview()
self.exampleContainerView = myView
})

if let imageUrl = NSURL(string: "http://swinggolfireland.com/wp-content/uploads/2014/09/OldHead_7PanB.jpg") {
let imageRequest: NSURLRequest = NSURLRequest(URL: imageUrl)
let queue: NSOperationQueue = NSOperationQueue.mainQueue()
NSURLConnection.sendAsynchronousRequest(imageRequest, queue: queue, completionHandler:{ (response: NSURLResponse!, data: NSData!, error: NSError!) -> Void in
if data != nil {
self.titleLabels.text = "Complete!"
self.exampleContainerView.hidden = true
self.startAnime.enabled = true
println("done")
self.myImage.image = UIImage(data: data)
self.myImage.layer.borderWidth = 2.0
self.myImage.layer.borderColor = UIColor.whiteColor().CGColor

} else {
self.titleLabels.text = "Error Downloading"
self.exampleContainerView.hidden = true
self.startAnime.enabled = true
println("error")
}
})
}

}
The code above will be executed once the user taps the Start button. It is big enough to explain all at once so we will break it pieces to understand it better.
var myView:BAFluidView = BAFluidView(frame: self.view.frame, startElevation: 0.5)

myView.strokeColor = UIColor.whiteColor()
myView.fillColor = UIColor(netHex: 0x2e353d)
myView.keepStationary()
myView.startAnimation()
titleLabels.textColor = UIColor.whiteColor()
self.exampleContainerView.hidden = false
myView.startAnimation()

self.view.insertSubview(myView, aboveSubview: self.backgroundView)

UIView.animateWithDuration(0.5, animations: {
myView.alpha=1.0
}, completion: { _ in
self.titleLabels.text = "Downloading"
self.startAnime.enabled = false
self.exampleContainerView.removeFromSuperview()
self.exampleContainerView = myView
})
The block above uses the BAFluidView class that we imported into our project using Cocoapods. We add the animation properties to myView which is a BAFluidView object. We then add properties to it such as it’s stroke color, fill color, etc. and start the animation. We then use UIView.animateWithDuration and make the exampleContainerView to myView. This fires up the Fluid loading indicator on part of the screen.
The next part of the code is:
if let imageUrl = NSURL(string: "http://swinggolfireland.com/wp-content/uploads/2014/09/OldHead_7PanB.jpg") {
let imageRequest: NSURLRequest = NSURLRequest(URL: imageUrl)
let queue: NSOperationQueue = NSOperationQueue.mainQueue()
NSURLConnection.sendAsynchronousRequest(imageRequest, queue: queue, completionHandler:{ (response: NSURLResponse!, data: NSData!, error: NSError!) -> Void in
if data != nil {
self.titleLabels.text = "Complete!"
self.exampleContainerView.hidden = true
self.startAnime.enabled = true
println("done")
self.myImage.image = UIImage(data: data)
self.myImage.layer.borderWidth = 2.0
self.myImage.layer.borderColor = UIColor.whiteColor().CGColor

} else {
self.titleLabels.text = "Error Downloading"
self.exampleContainerView.hidden = true
self.startAnime.enabled = true
println("error")
}
})
}
The code above downloads an image from a remote server, during the time of download it will show the loading Fluid animation and as soon as the image is loaded, the animation is terminated and UIImageView shows the downloaded image. The downloading of image from server is done asynchronously,i.e, performed in the background thread avoiding wait time in the main thread.
Voila! we have just mastered using a Fluid Animation Indicator. That’s all in this tutorial.
Running the App
So now you run the app with the big “Play” button in the top left of Xcode. You then need to set what device to run the app on. You can select a physical device (if you have a paid developer license). Otherwise, or even just for simpler testing, you can run it in the simulator. Choose the simulated device to run it on from the same menu.
Then wait a bit while the simulator loads. Mine took about 30 seconds to load. Then click on a cell and watch the magical wave transition occur!
Here is the source code on Github for the tutorial above !
I hope you found this article helpful. If you did, please don’t hesitate to share this post on Twitter or your social media of choice. The blog is still pretty new, and every share helps. Of course, if you have any questions, don’t hesitate to contact me on Twitter @swifty_os, and I’ll see what I can do. Thanks!



Leave a comment